More Majolica Manicures: Aucilla Polychrome & How To (Steps 1-13)
Earlier this year we put together our first PechaKucha for Florida Archaeology Month. Ryan talked about what to wear (or not) in the field, Kevin gave an ode to his trowel, and Emily Jane looked at archaeologists obsession with beer. My contribution was 20 slides/20 seconds each talking about the whats and whys of Majolica Manicures.
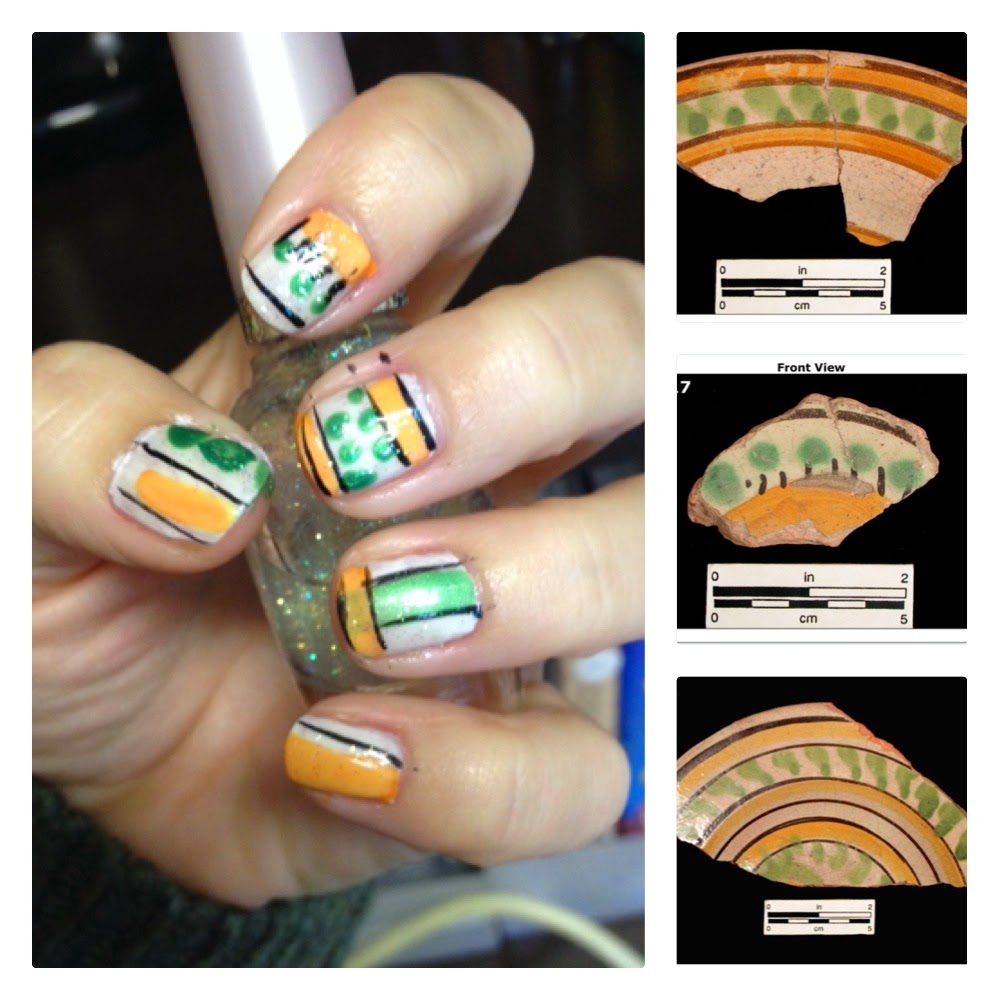
I couldn't go bare-nails, so I picked Aucilla polychrome in honor of 2014 Florida Archaeology Month's emphasis on paleo wet sites. The Aucilla River Project surveyed sites in the 1990s along the river including the Page/Ladson site and Sloth Hole where evidence of Floridians hunting mastodons 12,200 years ago was found.
Aucilla polychrome the majolica type is in no way related to the paleo sites but named for the same river where the ceramic was first identified by Goggin in 1968. Aucilla Polychrome was made in Mexico City and is found today by Florida archaeologists working on late 17th century sites.
Want to make your own? Follow these 13 steps and show your work on FPAN northeast's Facebook or Twitter using the #majolicamani hashtag.
 Step 1. Start with, research ceramic types and illustrated specimens on the Florida Museum of Natural History's Digital Type Collection. Aucilla has a slightly pink paste with a thin white glaze over the vessel. Thin black bands can be found on the rim and interior. Thicker bands of yellow are also present. What makes Aucilla beautiful to me is the presence of playful green dots, abstract flowers, and possibly butterflies.
  Step 2. Clear base coat applied, especially needed when working with white polish.
 Step 3. First layer of white. I'm such a nerd I use this China Glaze white as more of a primer so the true white I use to mimic Mexico City's more transluscent white will be visible.
  Step 4. I apply a thinner, not quite as bright a white layer of polish. On some real Aucilla sherds you can almost see the pink paste through the white glaze.
 Step 5. I put a speed set top coat on after the white layers. When working with bands it's important to have as dry a surface as possible or the lines may start to blur. Also helps move the think brushes along and not get caught up in differential drying.
Step 6. In Mexico City back in the day (ca 1650) they probably started first with the thin black lines. The artisans that applied the black line were regulated and had higher status than those applying the more abstract lines. One thing I've learned from these manicures is that it truly is the thinner lines that make the difference- a reason for the higher status. In 2014 however, I start with the green or larger colors as the black lines will blur if applied too early.
So I begin with so shapes inspired by designs from the illustrated specimens. The color palate is also very important when doing majolica manicures. I have multiple blues and greens so I can get as close a match as possible.


 Step 7. Now I add in the larger orange bands. Again, the color palate is crucial. This orange was a little too brown, which led to Step 8 (see below).


Step 8. The orange wasn't quite right, so I added a layer of yellow on top of the orange bands to get a brighter shade.
 Step 9. Add detail with fine black brush. This step has gotten much easier since I purchased the black polish with long, thin brush provided. I used to use a specialty brush I found at Sally's but didn't make as clean of a line as this one.
  Step 10. Time to clean up! I use nail polish remover to clean up the sides and remove overzealous lines.
ALMOST THERE....TWO MORE STEPS LEFT!!!
 Step 11. I've worked too long on it now for the manicure to get mushed up grabbing for my keys. Another later of speed set top coat to lock in the layers. This sometimes causes the black line to blur, but better safe than sorry.
 Step 12. Historical accuracy aside, they still need a little something extra. I add a controversial top sparkle layer. Helps catch the light and make it more interesting for me to stare at all day. Step 13. Like the scientific process that doesn't end just after data recovery (digging!) and data processing (labbing!), I finish off the manicure by taking photos, publishing on-line, and curating in my Majolica Manicure archive file.
For more #MajolicaMani posts check out:
- Aucilla Polychrome (1650-1700)
- San Elizario (1750-1800)
- San Luis Polychrome 1650-1750*
- Abo Polychrome 1650-1725*
- Puebla Polychrome 1650-1725*
- FAN NAIL! Faince (18th C)*

Text: Sarah Miller, FPAN staff
Images: Sarah Miller, except digital type collection images of Aucilla Polychrome sherds from Florida Museum of Natural History - Digital Type Collection.